Help
Click for most recent change-log
ACES User Guide
ACES is an online platform that enables Adelaide University users to complete their research ethics applications electronically. This website provides a platform for submitting, reviewing and managing applications related to animal ethics, human research ethics and biosafety compliance that can be accessed from any location.
Click on the links below or use Ctrl + F to search this page for help navigating the system.
Refer to the Contact Us page for information on how to request application advice, technical support, or additional feature requests.
|
Navigation Bar and Work Area Tiles |
Creating a Project |
Action Required On Form |
|
Work Area Actions |
Adding/Removing Personnel |
Transferring Project Ownership |
|
Project Folders and Project List |
Sharing a Project with Internal Collaborators (Roles) |
|
|
Emails and Notifications |
Adding Comments |
Duplicating an Application |
|
|
Compare with Previous Submissions |
Submitting a Report |
|
|
|
Closing a Project |
Your ACES Work Area
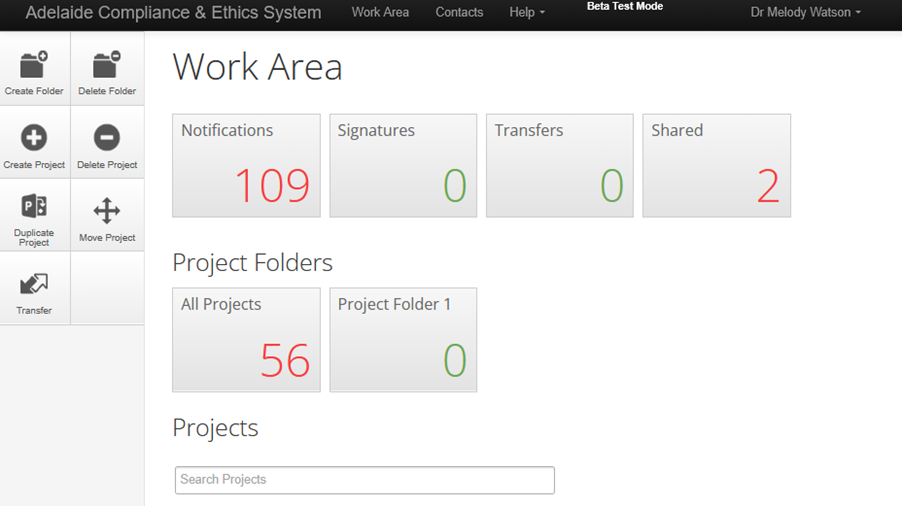
Navigation Bar and Work Area Tiles (centre and top)
Work Area - Your ACES homepage
Help - Includes contact information and technical support, FAQs, and templates to assist you in completing applications
Notifications - Displays items requiring your attention
Signatures - Once an application has progressed through to approval, the chief investigator or project supervisor’s signature will be requested. A notification will be sent via email and the application will sit in this folder. Upon signing, the approval certificate will be generated.
Transfers - Displays requests to transfer project ownership from other users
Shared - Displays projects that have been shared with you by another user
Work Area Actions (left)
Create Folder – Folders allow you to organise projects in your Work Area
Delete Folder - Remove an empty folder if no longer required
Create Project - Create an application for a new project
Delete Project - Remove an unsubmitted application if no longer required
Duplicate Project - Create a copy of an application (only the project owner can use this function)
Move Project - Move projects into folders as required
Transfer - Transfer ownership of a project to another user
Where projects have been moved into a custom folder, you must open the folder and use the action buttons within the folder to duplicate, delete or transfer.
Project Folders and Project List
If a folder is created using the Create Folder button, a Project Folders section will appear including an All Projects tile. Projects not assigned to a folder will appear below, in the project list.
Projects can be dragged from the project list into a folder.
Click the arrow next to the project title to open the project details and view sub-forms created within the project (e.g., annual reports, adverse events, etc).
Emails and Notifications
System Emails are sent from donotreply@Infonetica.net
The emails you receive are dependent on the role you are assigned to a project. All listed investigators will receive receipt, approval, and closure emails. Only those with access to edit the project (i.e., those who have been assigned a role) will receive emails advising them of reviewer comments, reminders and so on.
You cannot unsubscribe from system emails, however, if you believe you are receiving emails in error, contact the Project Owner listed in the email and ask them to remove you as a collaborator on the project.
System Notifications are sent at the same time as system emails and serve as a quick reference point in your Work Area. They can be accessed by clicking the ‘Notifications’ tile near the top of the area. You can open the relevant projects by clicking on the notification. You can delete notifications, mark them as read/unread or flag them as important.
Preparing a New Application
The following primary application types are available in ACES from 2026:
Animal Ethics - General Application
Animal Ethics – Notification of Ethics
Human Ethics - General Application
Human Ethics – Ratification of External HREC Approval
Biological Compliance – GMO Dealing Application
Biological Compliance – Non-GM Microbiological Risk
Some forms also have connected sub-forms, such as annual reports and adverse event reports. These only appear once a project has been approved.
For further information about which application type is required for your project, please contact the relevant committee or go to the Research and Innovation Portfolio website.
If you have any queries about completing applications, check the FAQs page, or contact the relevant Committee Officer.
Creating a Project
Starting in your Work Area:
- Click Create Project
- Enter the project title, select the required form in the dropdown list, then click Create.
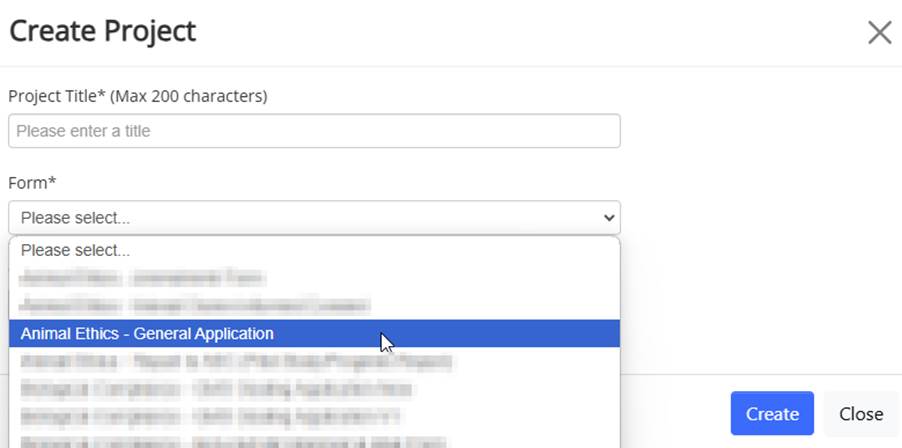
The project overview will now appear. To proceed:
- Click Start Here to begin completing the form
- Work through the form using the Previous and Next buttons in the action panel
- Click Navigate to return to the project homepage
- The chief investigator or project supervisor will need to sign the declaration at the end of the form. Note that this does not submit the application.
- Once you have completed the application and have reached the 'Ready to submit' page, by clicking yes. The Completeness Check will occur. This is to ensure you have completed all mandatory questions.
- Once it is confirmed that all mandatory questions have been completed, please ensure that you click ‘Submit’.
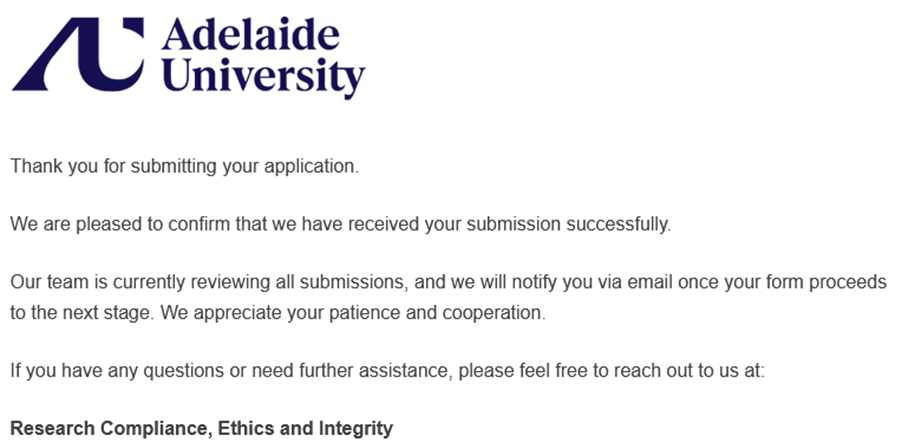
- Upon submission, you will be redirected to the submission confirmation page.
- All investigators listed on the application will receive an email receipt within 15 minutes of submission.
- If the application hasn't progressed to the submission confirmation page (below), check for a red warning banner across the top of the project home screen. If you can see this, the Project Owner will need to click Update to enable the submit button to appear. An update alert in a yellow banner is not mandatory and no functions are blocked.
Adding/Removing Personnel
Adding Internal Personnel
When adding personnel, there are restrictions in place. For example, students cannot be added as the Chief Investigator. If you have recently started employment with the University and the change is not reflected in ACES, please contact the Ethics or Compliance Officer for assistance.
To list Adelaide University investigators and/or students (or investigators subject to an existing access agreement with the Adelaide University Institutional Biosafety Committee), or those with visitor access:
- Search by typing a University email address or name into the Search User field.
- Double-click or hit the Tab button on your keyboard to add their details to the form. Single-clicks are not sufficient.
- Use Add Another beneath the last person in your list to add more investigators.
If the investigator’s name is not found using the search function, they need to log in and out of aces.adelaide.edu.au to activate their ACES account – they will then appear in the search list.
Contact details are retrieved from the University HR feed and cannot be edited within the form.
Adding External Personnel
Except where an individual has visitor access, external personnel must be entered manually. Listing an investigator on an application does not give them automatic access to the project in ACES. If an external investigator needs to view the form in ACES, an account must be created for them. To do this, email the relevant Ethics or Compliance Team (aec@adelaide.edu.au, hrec@adelaide.edu.au, or ibc@adelaide.edu.au) and provide the following information:
- Title
- Full Name
- Last Name
- Organisation
They will then be sent a link prompting them to set a password and login. Once this is done, you will need to assign them a role in the application (see below). You must also assign them a role to provide them with access.
Removing Personnel
To remove an investigator click Remove beneath the person you wish to remove. The contact details will highlight in red indicating the person to be removed. For mandatory roles, e.g. Chief Investigator, you cannot remove the person listed. Instead, you need to use the Search User bar to enter the name of the person who will be taking on the role. Once selected, this person’s details will overwrite the details of the original investigator listed in the contact block.
Sharing a Project with Collaborators
Listing an investigator on an application does not give them automatic access to the project in ACES. For another investigator to view the application, it will need to be shared with them, whether they are internal or external.
Depending on application type, there are two ways to do this: the Share feature (biological compliance and human research ethics) and Roles (animal ethics).
To share an application:
- Open a project in your Work Area.
- Click Share in the Action Panel. You must have the main form selected in order to see this button.
- Enter the collaborator's email address.
- Select which permissions you would like to give them (e.g., Read, Write, Submit, etc).
- Use the green + button to list additional collaborators and assign their permissions.
- Click Share to save.
To assign a role:
- Open a project in your Work Area.
- Click Roles in the Action Panel. You must have the main form selected in order to see this button.
- Enter the collaborator's email address. This must be an Adelaide University email address.
- Select the relevant role from the dropdown list. When granted, they will be assigned that role for the entire project - that's the main form and all existing and future sub-forms.
- Use the green + button to list additional collaborators and assign their role.
- Click Share Role to save.
- Click Roles to view all collaborators who have been assigned roles on the selected project. You must have the main form selected in order to see this button.
- Click Remove to remove a specific role that has been assigned to a collaborator, or, if the collaborator has multiple roles and is therefore listed multiple times, you can click Remove All Permissions for this person. If a collaborator is listed multiple times, the role with the highest level of access will apply.
You cannot edit existing roles, but you can remove roles and reassign new roles if required.
Adding Comments
Investigators can write comments to other investigators regarding specific questions within the application (e.g., a student wanting to check their response to a question with their supervisor before submission). Please note: These comments will only be visible to other investigators with access to the project and are not visible to Committee Members or the Ethics/Compliance Office.
- To add a comment, click the Comment bubble to the right of the relevant question
- Click Add Comment and type the comment you wish to make then click Save.
Compare with Previous Submissions
To view all changes made to the submission since the previous submission:
- Open the Project, then open a page of the form
- Click Compare with Previous Submission.
- Any changed questions will be listed on the This Page, or All Changes tab
- Removed responses will be highlighted in red, whilst new content will be highlighted in green.
- Changes made by all collaborators with edit access will be listed.
- Changes may include new questions added or removed due to form updates.
- The form is not editable when viewing changes compared to the previous submission. If you wish to make edits, click Return to Edit Mode
Managing your Project
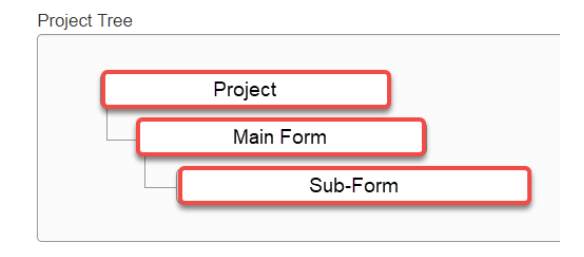
In the project view, the project tree displays the forms which have been created for a particular project.
- The top (Project) level displays the Project title
- The second (Main Form) level displays the main form type that was selected when the project was created
- Any forms listed beneath the main form are referred to as sub-forms. These include incident reports, annual reports etc.
- The second (Main Form) level displays the main form type that was selected when the project was created
Clicking on any form in the list will display the form status details and the form contents in the navigation section below.
Action Required on Form
This section of the submission page advises whether there are actions required from you as the applicant (e.g., incomplete mandatory fields or change requests from the committee):
- If it says Yes, click through to view a list of the remaining mandatory questions which are yet to be answered
- If it says No, all mandatory questions are complete and the form is ready to be, or has already been submitted.
Transferring Project Ownership
Project ownership can be transferred to another person; however, this process removes the current Project Owner from the project. If this person is still involved with the project, it is advised that they add themselves to the project in the relevant section before transferring the project to the new Project Owner. The transfer must be accepted by the recipient.
After acceptance of the transfer, the new Project Owner can then provide collaborator access to the previous Project Owner as required.
To transfer a project:
- In your Work Area, click Transfer in the action panel
- Enter the email address of the new Project Owner.
- Select the relevant project from the list.
- Click Transfer to complete the action. The new Project Owner will receive an email to inform them of the transfer request.
To Accept or Reject A transfer:
- Either:
- Click on the link in the transfer request email,
- Or, if beginning from your Work Area, click Transfers then click View Project.
- In the project action panel, click Accept Transfer or Reject Transfer
- If the transfer is accepted, the project will now appear with the Work Area project list of the new Project Owner. The previous Project Owner will no longer see this project in their project list. The new Project Owner may need to provide them with collaborator access
Transferring an approved project typically requires an amendment to be submitted.
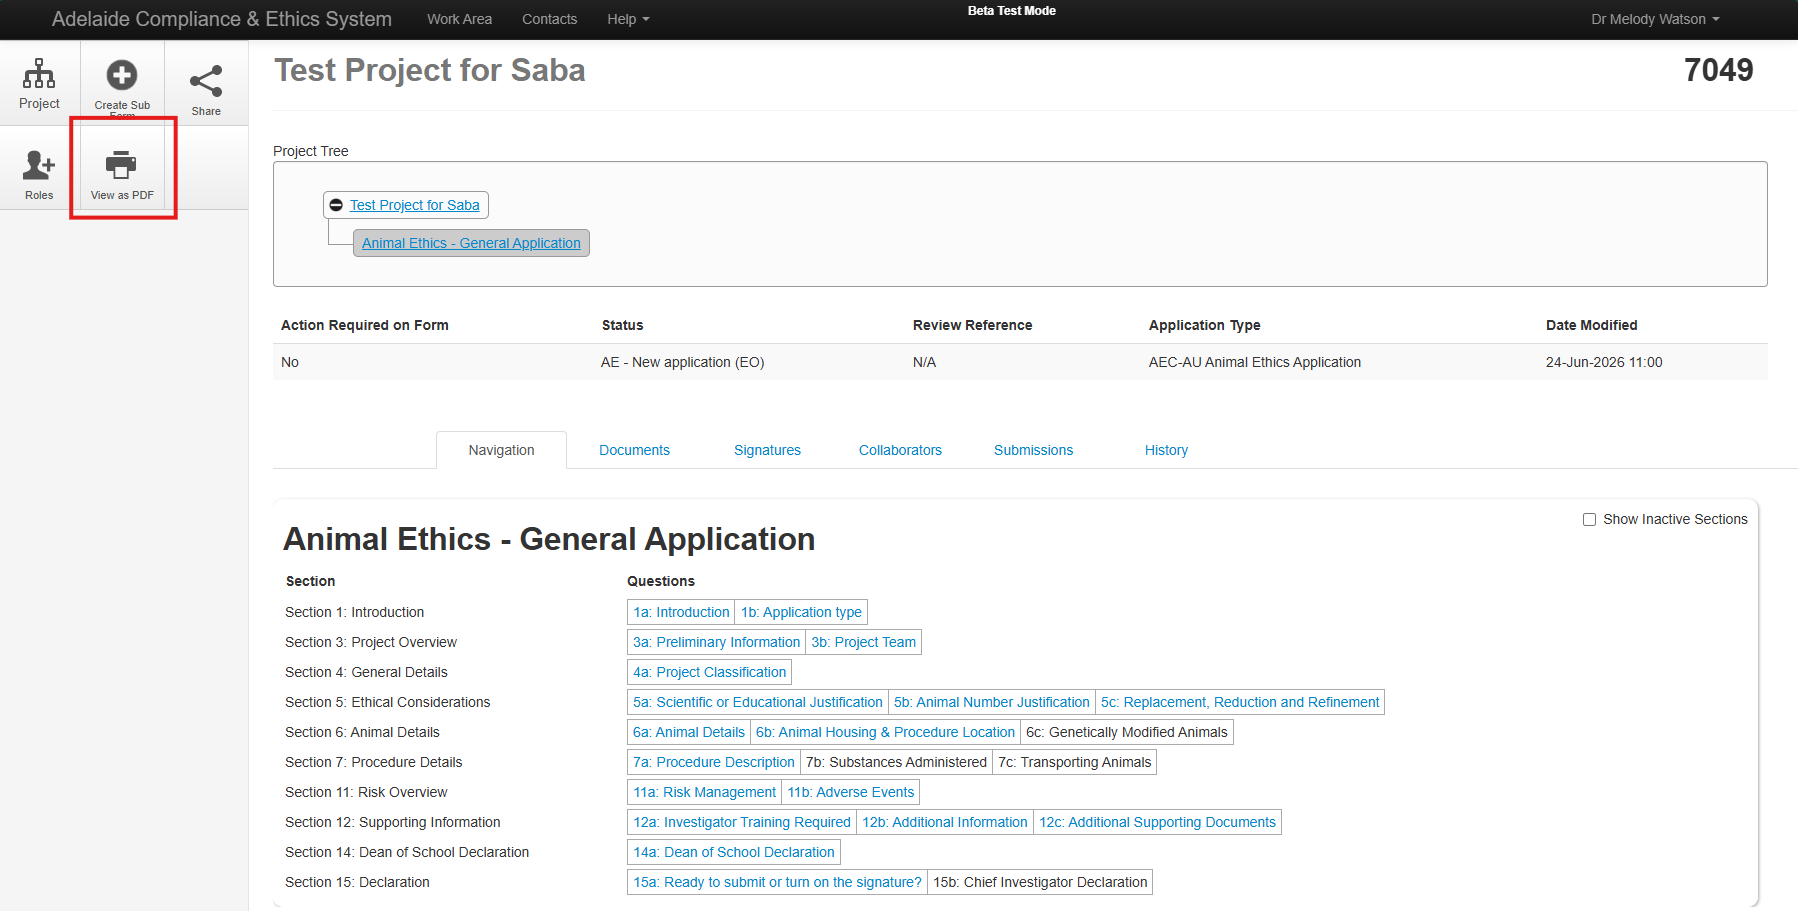
Printing/Downloading an Application
To print/download an application form:
- Open a project
- Click View as PDF
Optional: You can select ‘As tabular summaries’ to display tables rather than standard form layout for questions where this feature is enabled.
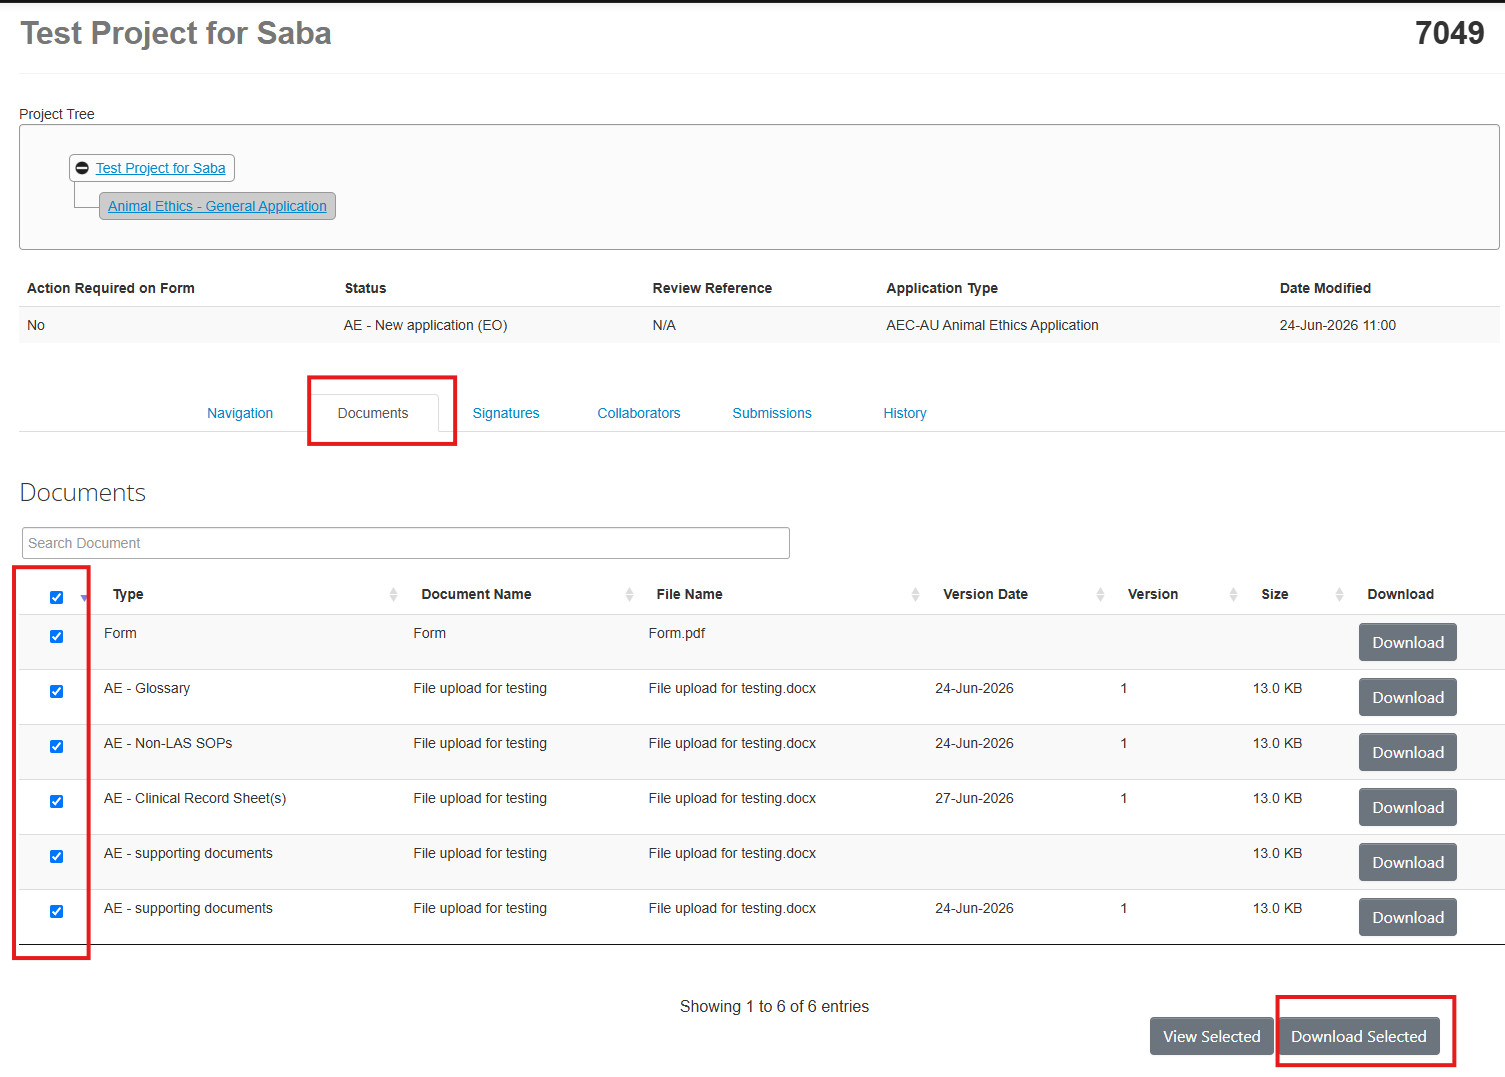
To print the form and all (or selected) attachments:
- Click Documents
- Untick any documents that are not required in a printed view
- Click View Selected to print. Or click Download All to download a ZIP file of the application and all selected attachments.
Duplicating an Application
Project Owners are able to duplicate the content of an existing project into a new application. This function is useful if you have multiple projects with similar content, or if you need to replace an expired application.
All form content will be duplicated into the new project except for any attached documents which will need to be uploaded manually. Animal Ethics users will also need to manually update the Animal Ethics section of the form since species information cannot be duplicated.
To duplicate an application:
- In your Work Area click Duplicate Project. Do not select 'including sub-forms'.
- Enter the new project title
- Click Duplicate
- Edit and submit the new application – ensure that all information duplicated is relevant to the new application. Do not upload legacy files or previously approved amendments – if these are still relevant, the content should be added to your responses to the form questions so that your new application can be reviewed as a standalone application.
Submitting Sub-Forms
Where applicable, annual reports, final reports, research reports and incidents or adverse events are submitted in ACES as sub-forms of the main application. All sub-forms linked to a project are listed beneath the main application form in the Project Tree.
Only the Project Owner or collaborators with full access are able to create sub-forms.
Sub-forms can only be created once the main form has been approved.
- In your Work Area, open the project you wish to submit a report for
- Click Create Sub-Form in the action panel
- Select the relevant report from the dropdown list
- Complete the form
- Click Submit
All investigators listed on the application will receive an email receipt upon submission.
Closing a Project
For animal and human research ethics, projects should be closed once the work is complete, or if the investigators are no longer employed by the university.
To close a project, submit a final report.
For IBC applications, the biological compliance team manually closes projects upon expiry, which triggers a notification email to applicants with information about regulatory requirements.
Change Log - Forms - 5/05/26
Biological Compliance — GMO Dealing Application
- General updates to clarify advice and wording of some questions, and update links where required.
- Part A:
- Consolidated ‘Dealing Activities’ and ‘Personnel and Facility Categories’ onto one page.
- Moved ‘Project Title’ and ‘Project Supervisor’ to the beginning of section.
- Clarified that ‘University of Adelaide’ should not be selected as institution responsible for dealings.
- Added text explaining that the applicant must assign the ‘Project Supervisor’ role to the project supervisor when filling out this section to provide visibility.
- Added question to confirm that Project Supervisor role has been shared.
- Moved question about animal ethics approval into ‘Preliminary Information’ section.
- Part B:
- [Exempt GMO Description]: Added ability to upload vector maps to ‘Exempt GMO Description’.
- [Exempt GMO Description]: Added question related to types of proposed genetic modifications.
- [NLRD GMO Description]: Added question related to types of proposed genetic modifications.
- Part C:
- [Description of Proposed Work with GMOs]: Added dependent question relating to criteria for viral vectors to meet re: minimising risk of restoring replication competence.
- [Transport, Storage & Disposal>Disposal]: Added question related to exposure of animals to GM microorganisms or viral vectors and dependent questions for further information.
- Part D:
- [Risk Assessment and Controls]: Moved question about standard spill procedures to the first page of this section.
- [Risk Assessment – Microorganisms and Viral Vectors]: Added question related to use of cell sorters and associated risks and question related to circumstances that could lead to exposure or unintentional release of microorganisms.
- [Risk Assessment – Terrestrial Animals]: Added question about housing of animals for in vivo work.
- Part E:
- ‘Personnel Details’ and ‘Training’ combined into one section.
- [Training]: Added dependent question related to completion of required training.
- Declarations:
- Added page for providing facility manager declarations with upload field and explanatory text.
Biological Compliance — Non-GM Microbiological Safety Application
- Minor updates to wording.
Animal Ethics – General Application
- Minor updates to wording of questions, explanatory text and links.
- Section 5:
- [Power Calculations]: Moved question about derivation of animal numbers based on power calculations into previous question group, renumbered as 5.2.12 (previous 5.2.12 now 5.2.13).
- [Scientific or Educational Justification]: Removed dependencies to make 5.1.7 (Differ/Follow On from Previous Work) mandatory for all applications.
- Section 6:
- [Animal Details]: Made long version of animal source question optional.
- [Animal Housing/Holding Facility Details]:
- Made long version of 6.3.3.1 optional.
- Updated options for 6.3.2.
- Added question to support data migration.
- Added new question (6.3.5b) to allow for longer answers to 6.3.5a (Maximum Number of Animals to be Housed).
- [Interstate Locations]: Updated guidance and links related to interstate work and notifications (licence documents now available in Templates).
- Section 7:
- [Procedure Types, Techniques and Pain]: Minor updates to list options and addition of question to support data migration.
- [Procedure Types, Techniques and Pain]: Replaced 7.2.7 (Pain Duration) with new multiple-selection checklist (Pain/Distress Duration).
- [Procedure Types, Techniques and Pain]: Replaced 7.2.9 (Pain Associated with Model) with an identical question in a standalone question group.
- [Experimental Plan/Flow Chart]: Clarified wording to emphasise that multiple flow charts can be uploaded.
- [Procedure Description] Made SOP upload optional.
- [Transporting Animals] Fixed error in 7.6.1 that made one answer clear others.
- Section 9:
- [Teaching/Training] Made options for level of teaching involved non-exclusive.
- Section 10:
- [Animal Breeding]: Replaced 10.1.1 (Name of Breeding Colony/Strain) with multi-line text box to allow longer answers.
- Section 12:
- [Related Applications and Committee Approvals]: Updated dependencies for 12.2.10–15 to enhance clarity.
Human Ethics – General Application
- Updated guidance and questions related to college and review pathways for lower-risk and greater-than-low-risk applications in Sections D and V, including phasing out legacy questions.
- Added screening questions to restrict incorrectly completed applications.
- Minor updates to wording, guidance and links.
- Section C:
- [Co-Investigators]: Updated dependencies and questions.
[Plain Language Summary]: Added new question (C.1.3b) to capture summary of overall procedures and data collection methods.
- Section D:
- [Project Classification]: Clarified guidance related to college selection in D.3.1.
- [Study Sites]: Clarified that third-party organisations to be listed in L.10.1.2 must be listed as external sites in D.2.2–13.
- Section L:
- [Third Party Organisation]: Clarified that third-party organisations must also be added in D.2.2 to be available for selection in L.10.1.2.
- Section W:
- [Declaration]: Updated wording of declaration and chief investigator confirmation.
Human Ethics – Ratification of External HREC Approval Application
- Section B.2:
- [Insurance Notification]: Clarified and enhanced guidance relating to insurance requirements and criteria, and updated questions to reflect requirements.
- Section B.1:
- [Investigators] Added additional clarifying text related to investigators and AU employment, and made non-fillable fields editable to assist with tracking external researchers.
- [Approval Details]: Clarified requirements for document uploads (e.g., copy of project approval letter, copy of full protocol, etc).
Change Log - Forms - 16/06/26
Animal Ethics — General Application
- General updates to wording and links.
- Section 1:
- Added questions related to legacy records (migrated applications only).
- Section 2:
- [2.2 Unexpected Adverse Events] Added questions related to adverse events noted in legacy records (migrated applications only).
- Section 6:
- [6.3 Animal Housing/Holding Facility Details] Fixed erroneous mandatory flag and dependencies for long-form answers.
- [6.4 Procedure Location] Minor updates to list in 6.4.1.
- [6.5 Interstate Locations] Updated guidance about notifications and licences, including addition of link to Victoria fieldwork notifications form.
- Section 12:
- Added questions related to actions required noted in legacy records (migrated applications only).
Animal Ethics — Unexpected Adverse Event Report
- Fixed erroneous mandatory flag in chief investigator details
Biological Compliance — GMO Dealing Application Form
- Removed a duplicated question related to animal housing.
Human Ethics — General Application
- Significantly updated wording across the form, including:
- updating references to and excerpts from the National Statement
- amending wording of some concepts in line with changes to the National Statement
- clarifying and updating help text and guidance
- fixing broken links to the Staff Portal and University forms
- Section V:
- [V.1 Review Pathway] Updated review pathway questions and dependencies for both new applications and amendments.